.png)
If you're migrating to HubSpot as your new ESP (Email Service Provider) or your email program has grown large enough that you're worried about protecting your corporate domain, listen up. Email deliverability standards have gotten stricter, and mixing your marketing emails with your corporate domain is a recipe for disaster.
Here's what we mean by disaster: imagine your CEO can't get emails through to prospects because your marketing newsletter tanked your domain reputation. It happens more than you think. We recently worked with a company sending a legitimate opt-in newsletter to 70K subscribers who saw a 3% bounce rate, 1% unsubscribe rate, and 19 spam complaints in a single send. Their executives started complaining that their own business emails weren't landing in inboxes anymore. The culprit? Marketing and corporate email were using the same domain.
The solution is straightforward: create a separate subdomain for your marketing emails and warm it up properly before you start sending at volume. Whether you're switching to HubSpot as your ESP or you've realized your email program has outgrown sharing a domain with your executive team, this guide will walk you through exactly how to set up and warm up a marketing email sending domain.
It's about to get B-O-R-I-N-G. We are not going to explain technical tasks in detail. It is simply too many long, awful paragraphs as it is.
Time to complete this task: about 40-60 days. Email is no joke.
Step 1. In the short run, validate your current email domain DNS setup
In a prior blog article, we told you how to setup your email DNS properly for the new rules. Please do that if you haven't.
Then, validate your setup. HubSpot will validate it and say it's okay.
However, don't trust HubSpot. Run an MXToolbox verification. Or use a third-party tool that comes with ZeroBounce.com, which we will discuss later.
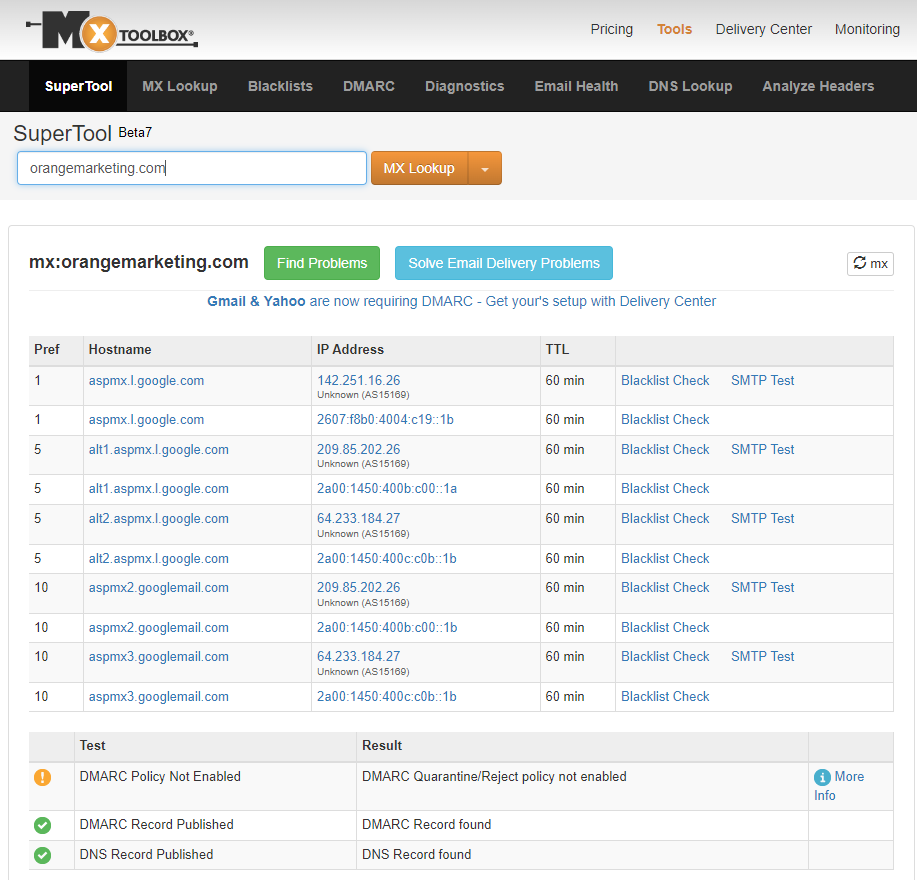
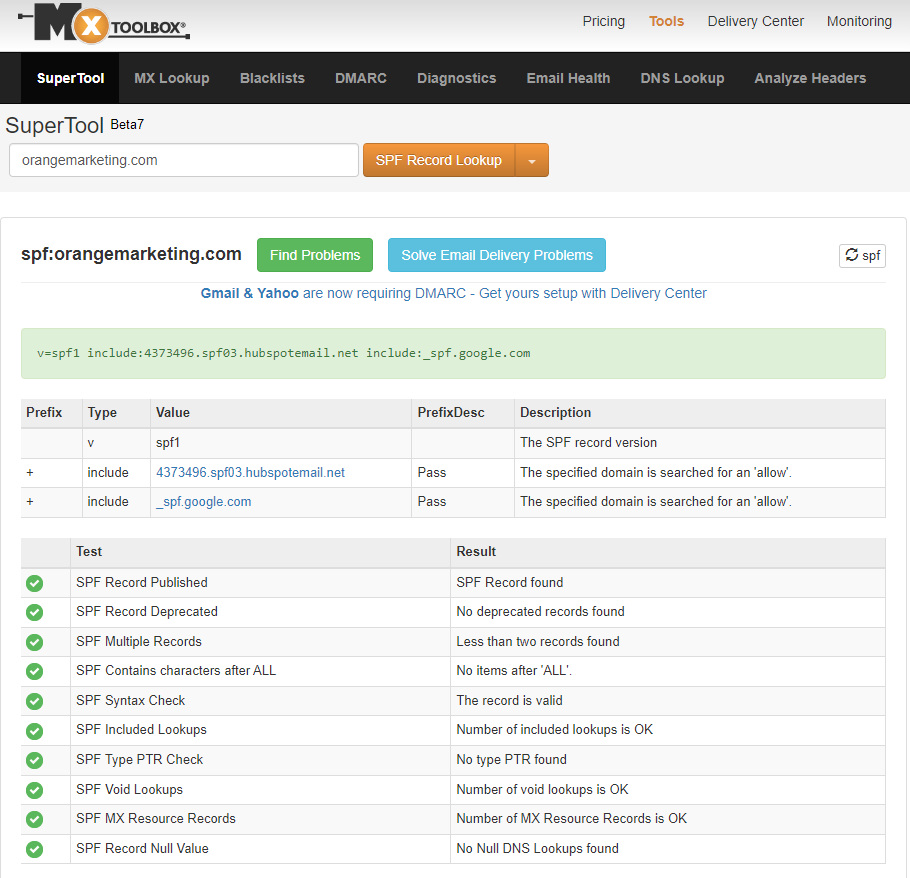
For example, our customer at the beginning of the story, ran MXToolbox against her sending domain and spotted some SPF record problems that HubSpot was not seeing.
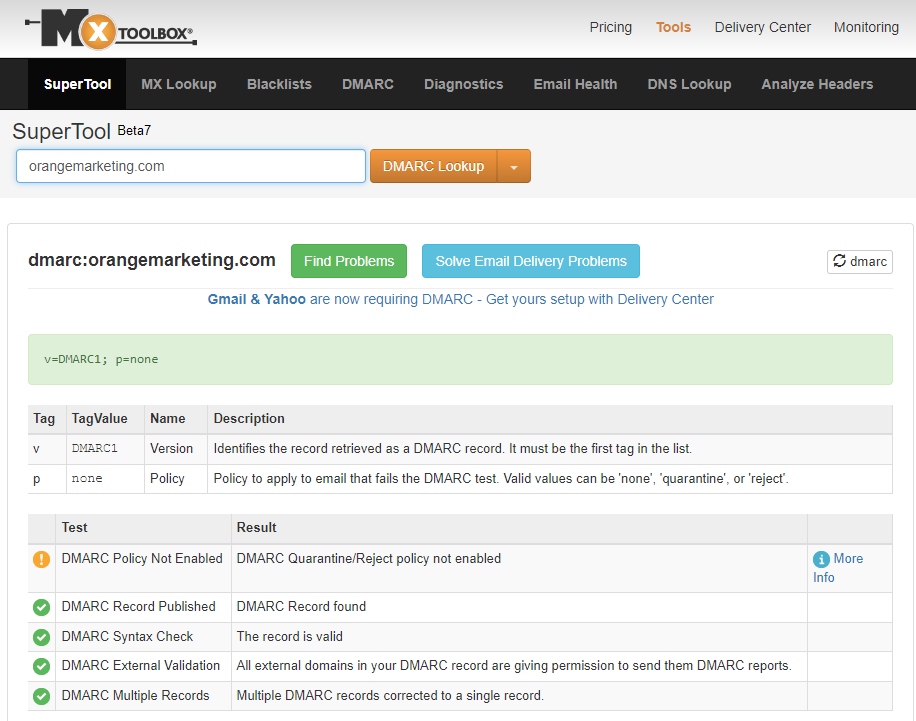
Check your MX, SPF, and DMARC records. You can also check your HubSpot DKIM records (advanced skills but a good idea). You can see our screens below. It is more or less good results with one warning on DMARC. We are fine with this warning.
Step 2. Setup a New email sending domain
If your bulk email results are tanking, we suggest pausing email while you execute our steps.
Get a new email-sending domain.
a) Either - buy another domain from GoDaddy like "goorangemarketing.com. However, it has to be a .com -- HubSpot CMS Enterprise users can have 10 domains OR
MORE LIKELY FOR HUBSPOT PRO USERS
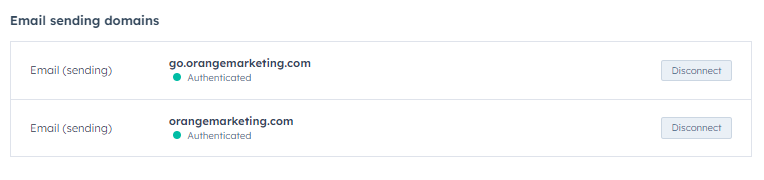
b) Set up a subdomain like go.orangemarketing.com where "go" is called a subdomain. There are some schools of thought that like the subdomain route, and others that like the brand new domain. Sometimes, when dealing with corporate I.T., a subdomain is the easiest way to go. ALSO - on HubSpot at the Pro level, you are only allowed one domain. So subdomain it will have to be! Now go setup and configure in HubSpot. Excellent article by HubSpot walking you though your domain configuration step-by-step.
Here is our real sending email setup.
Step 3. Get a live email box (or boxes) on new Sending Domain or Subdomain
You need to tell your I.T. you need a real live email running off this domain. They may balk. If you are more of an entrepreneur or startup and use Google tools it is easy enough for you to establish all of this yourself. GoDaddy will also give you an office 365 email box attached to a new domain. Finally, some third-party providers will buy your domain and set up the boxes on your new domain. It's far less hassle to go that way.
For marketing noreplies, we like hello as in "hello at go dot orangemarketing dot com"
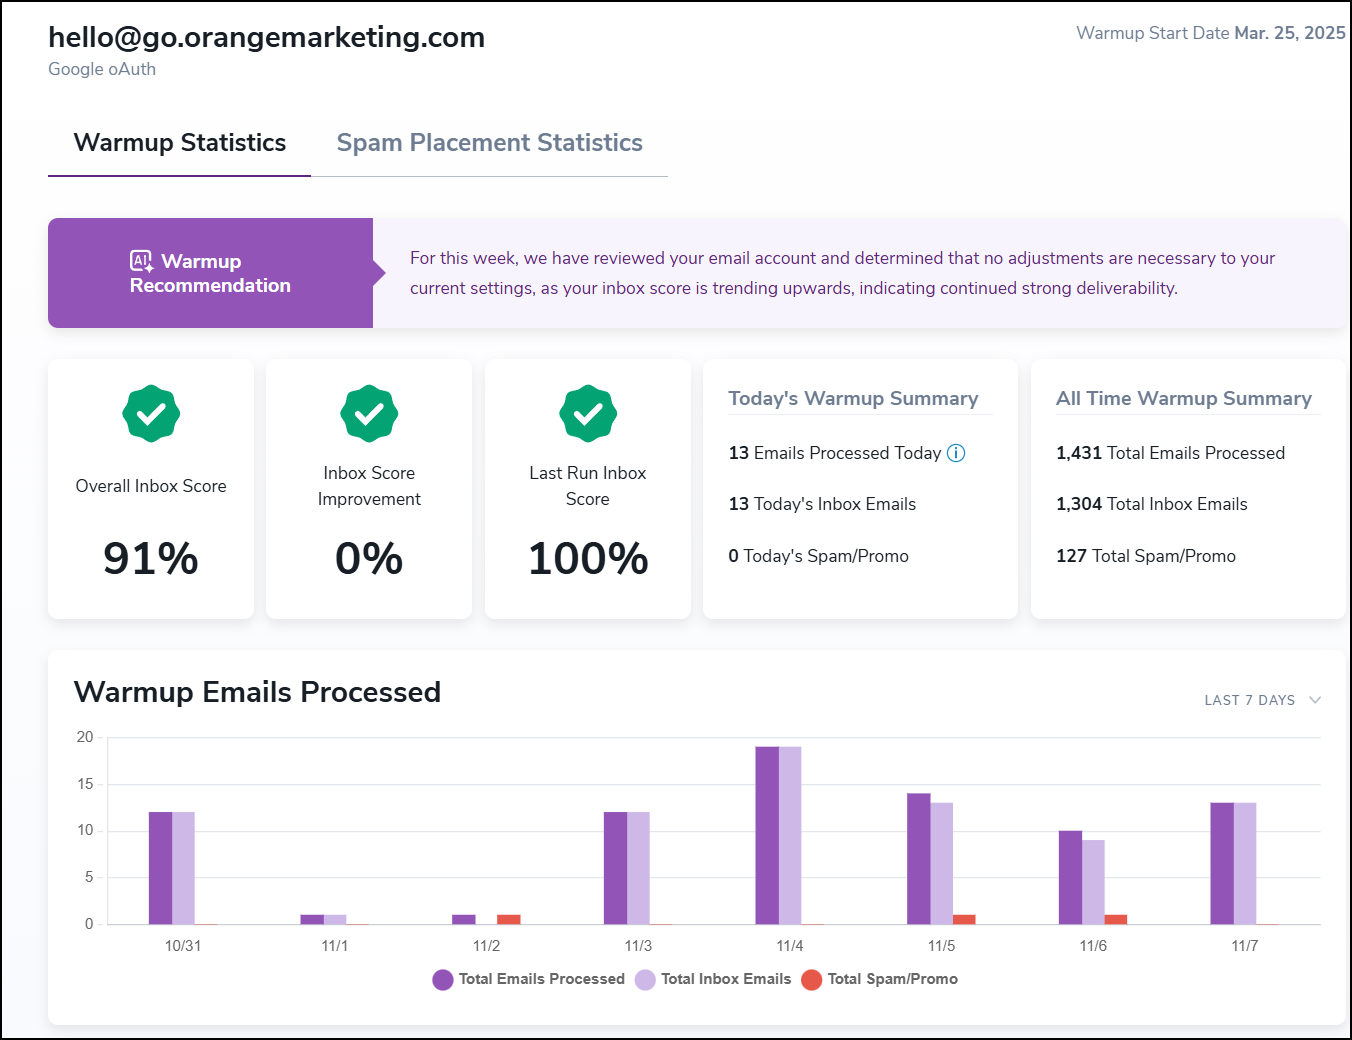
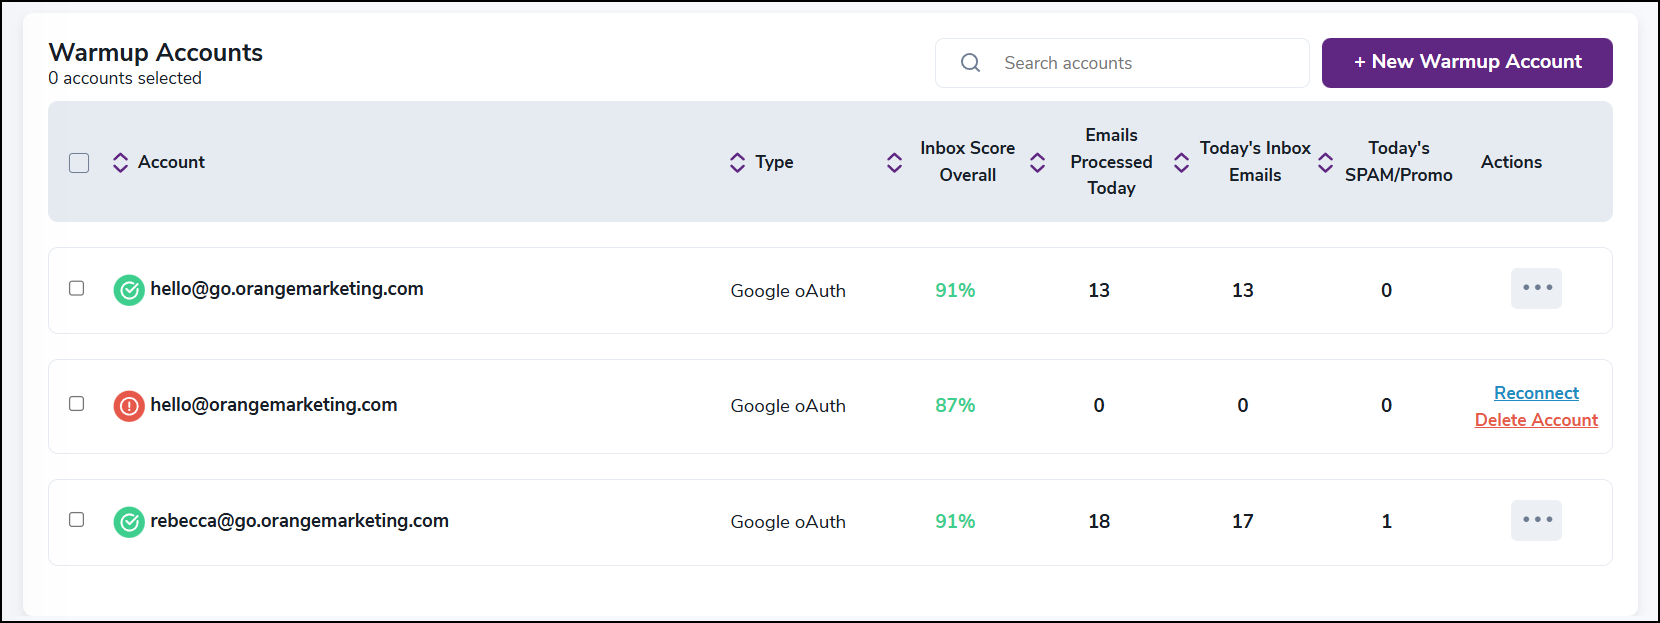
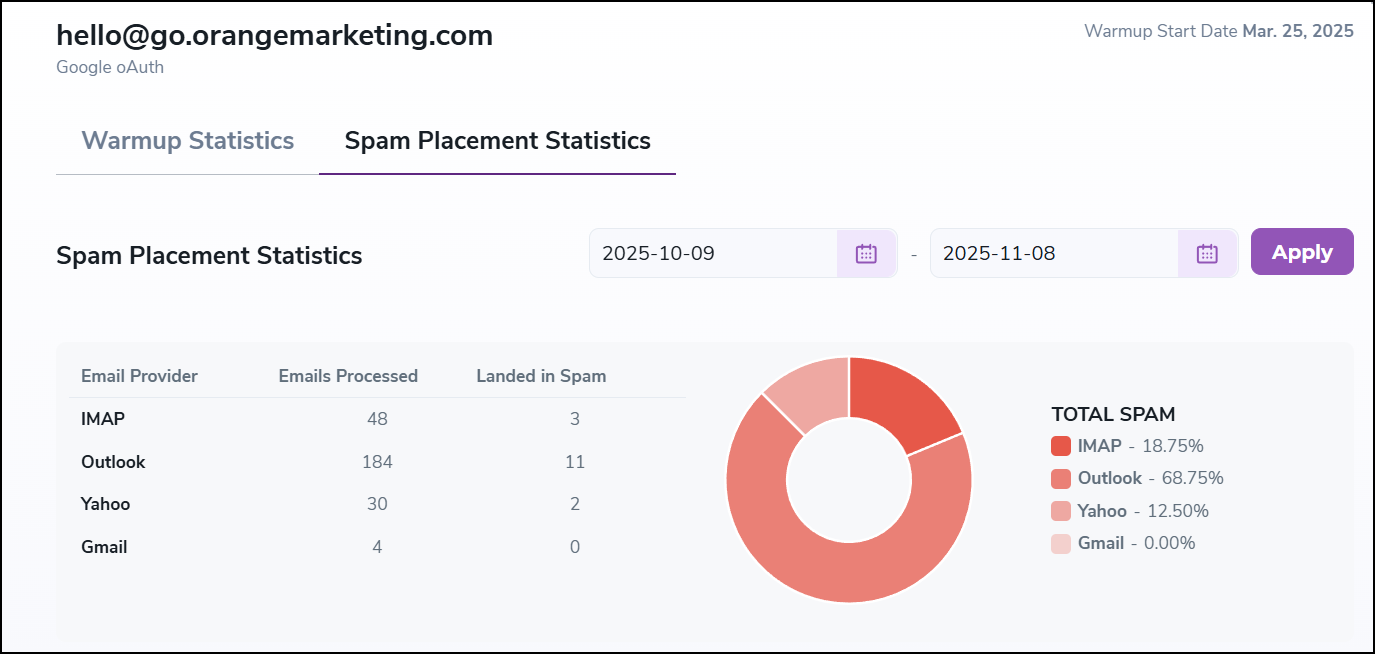
Step 4. Run an inbox warmup process (automated inbox validation)
We like Zerobounce.net for ~$15/inbox. You have to hook Zerobounceup to your email inbox. Some third-party vendors will buy the domain, set up the mailbox, and warm it up. Often, these are vendors associated with cold email strategies (I am not going to explain this). But, you are trying to set up an excellent opt-in email domain and email box for HubSpot to send real live opt-in marketing email.
Once you have your new email domain and box warming up on need to let it go for 2-4 weeks. Zerobounce will also validate your domain setup.
Step 5. Parse your emails into "sendable email" and "non-sendable email"
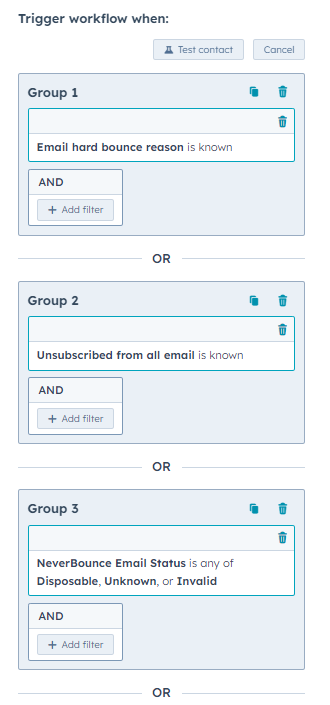
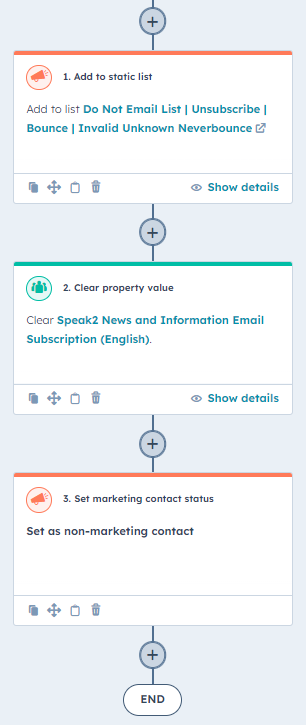
1) Create a static list in HubSpot called: Non-sendable email
2) Create a workflow to get all your bounced, unsubscribed, and poor verification emails into this static list.
Here is an example:
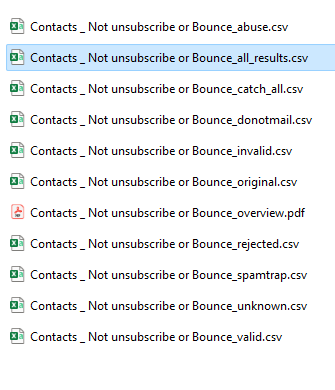
Step 6. Send your "sendable email" list to a third party for validation
Your sendable email is a list that you create of your whole email database which excludes the list you created in Step 5. You must export this list as a CSV and send it to a third party to validate the emails. We like one product above all others: zerobounce.net. It validates emails very cheaply, like $0.009 per 5,000 emails. We are going with ZeroBounce more because it includes other helpful email validation tools. Also, ZeroBounce returns many codes that help you understand what is happening with your database's emails.
Main codes are Valid, Invalid, Catch-all, Spamtrap, Abuse, Do_not_mail and Unknown.
Lately, we are only emailing VALID. Catch-all can be potentially good email, but you segment them into a separate group and test them later After you have warmed up your email-sending domain.
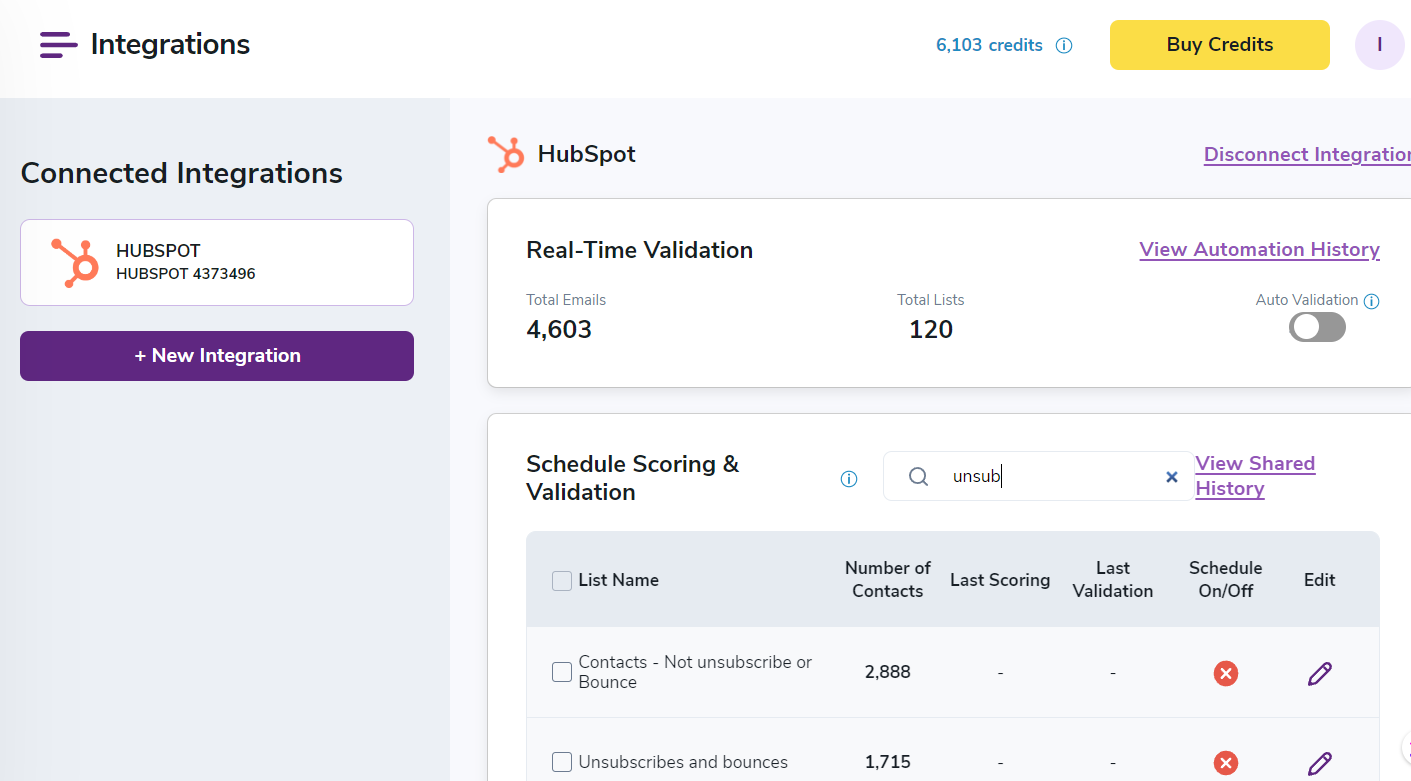
The Zerobounce HubSpot integration allows you to select a list and verify it. It also allows you to set up on-the-spot email validation right in your HubSpot forms. A link to their HubSpot CRM integration & HubSpot Forms Integration
Step 7. Upload the email validation results back into HubSpot
We typically create a property in HubSpot and put all the codes into it, so we can upload the results later to run lists and workflows off the property.
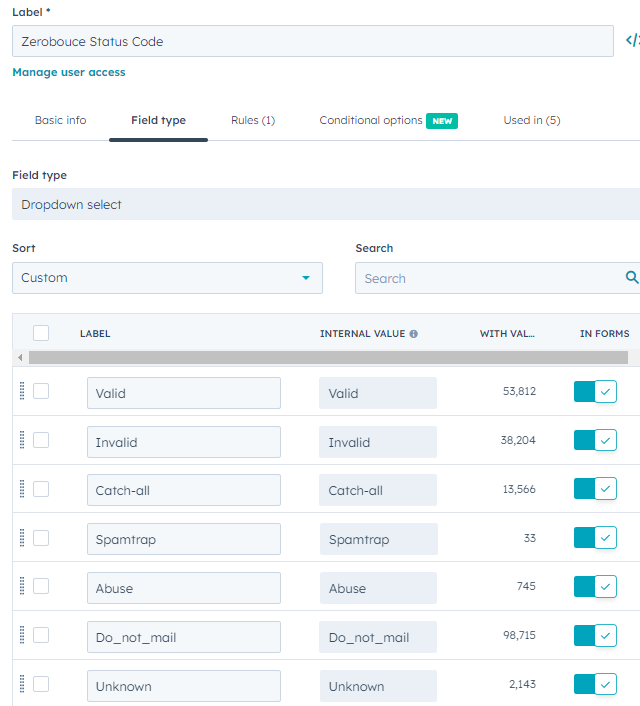
You could also create and load properties on ZeroBounce free_email yes/no and ZeroBounce Sub-Status Code for granular knowledge on your mail database.
Once you get these codes back into your HubSpot (we load only HubSpot record ID and the validation codes), ensure that your "unmailable" list workflow includes the codes of "Invalid, Spamtrap, Abuse, and Unknown". To see how you feel, you must read the "Do_not_mail" sub-codes. Note that the client in the example above has nearly 100,000 emails in this category. They deliberately send a lot of mail to administrator accounts like accounting@company.com. These are considered Do_not_mail by ZeroBounce standards.
Now, you have two comprehensive extensive lists of bad and good emails.
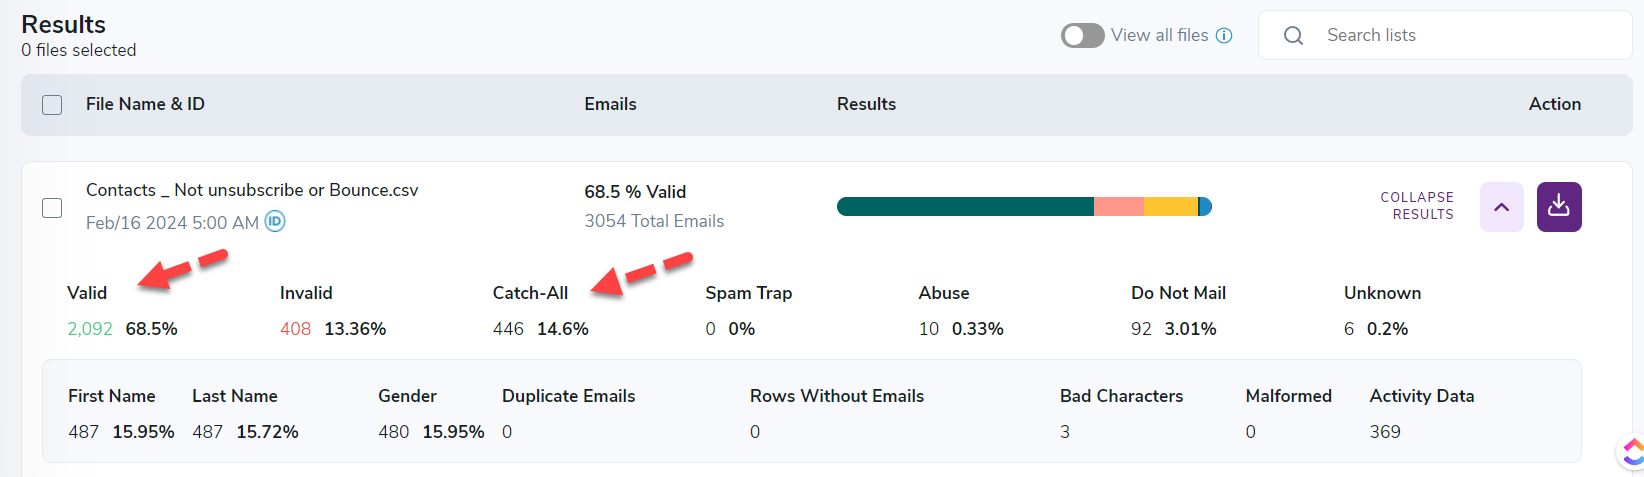
In this example of 3,054 emails that haven't bounced or unsubscribed, only 2,092 qualify as "VALID" or 69%. There is another 15% that are "CATCH-ALL" which is likely okay, but a higher bounce rate.
Step 8. Create a list of only your Valid emails
This is exactly like what it sounds. Select your email validation code of "valid" and "Catchall" and create 2 lists. You also need to ensure these are Marketing Contacts in HubSpot. We tend to email to our valids first with our friendlies emails (your company employees) and your catchalls second.
- VALID
- CATCHALL
Step 9. Number your Valid list for warmup and Upload to HubSpot
I won't go into the gross details. But at this point, we exported the valid list to Excel. Then, we create a column called "Email List Count." We also create a numeric property in your HubSpot called "Email List Count."
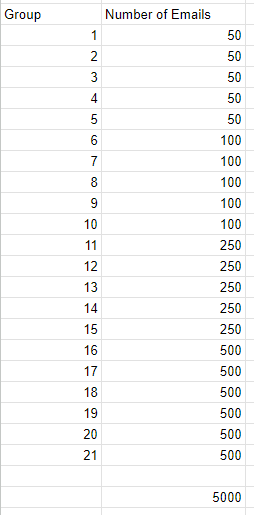
We number the entire list in batches for warm-up. The first five batches are groups of 50. And then five groups of 100. Then we get brave and start doing groups of 250. Then if a small list, like 10,000 or less, we will leave groups of 500. If we have a lot of email to validate, we will create groups of 1000.
We upload the list back to HubSpot using a record-id match, and then the Email List Count field is populated. None of this process is scientifically validated. It is just what we are comfortable doing based on B2B email experience.
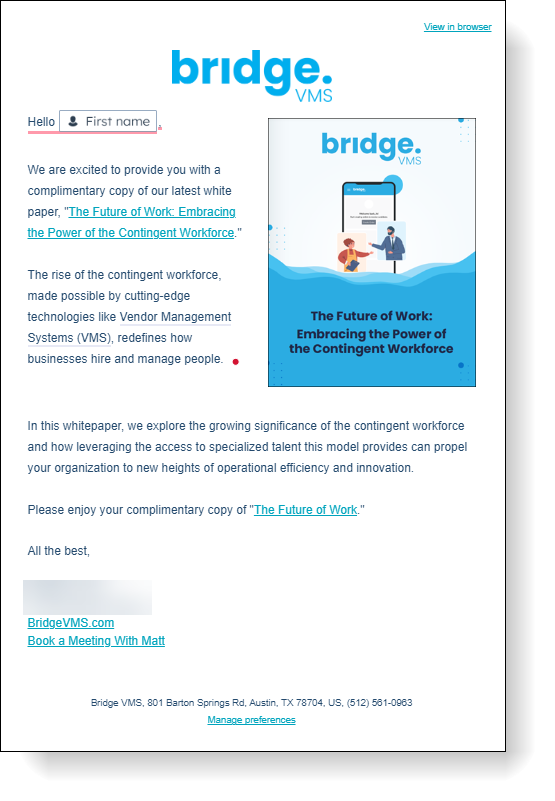
Step 10. Create a super Friendly Warm-up Email
We will create an email we will use for the warmup process. We like to create an extremely friendly email that gives away a piece of content, and isn't overly riddled with marketing nonsense. It encourages clicks and opens but doesn't scream spam or be annoying. We have had clients make the warm-up email more of an offer, but that was their choice.
Here is a pretty normal one:
Step 11. Send the warmup email to Your Valid Lists
After the inbox warmup has run for 10-20 days, you can start sending your HubSpot marketing email. Using the list count field, you create your sending lists.
Start with email list count 1, create a list, and use this list to send the first email. Add a "seed" list with some friendly emails to every mailing. Tell your friendlies to open, click, and forward the email. They will get this email for the life of the campaign, and if they could remember to do this every day, it would send sound signals to the email gods.
You send the same email to your list by list count number daily. If you feel insane, it could be an email warmup marketing sequence with three friendly emails kicked off every 2-3 business days.
This is an excellent project for an intern to queue up and manage. In the example above, we will send emails for 21 days straight. So between the email inbox warmup and this marketing email send warmup, about 40 days will have elapsed. Watch the emails daily for any weird or unusual activity like too many bounces, spam, or unsubscribes. Dig in and analyze. Something may be wrong or going wrong. Don't be scared, though. You are essentially cleaning your whole list, so don't be scared. Once you go through this and send marketing emails for 3-6 months, you will have a great list and email reputation.
We also have a sophisticated workflow that handles this task more efficiently. But always watch it.
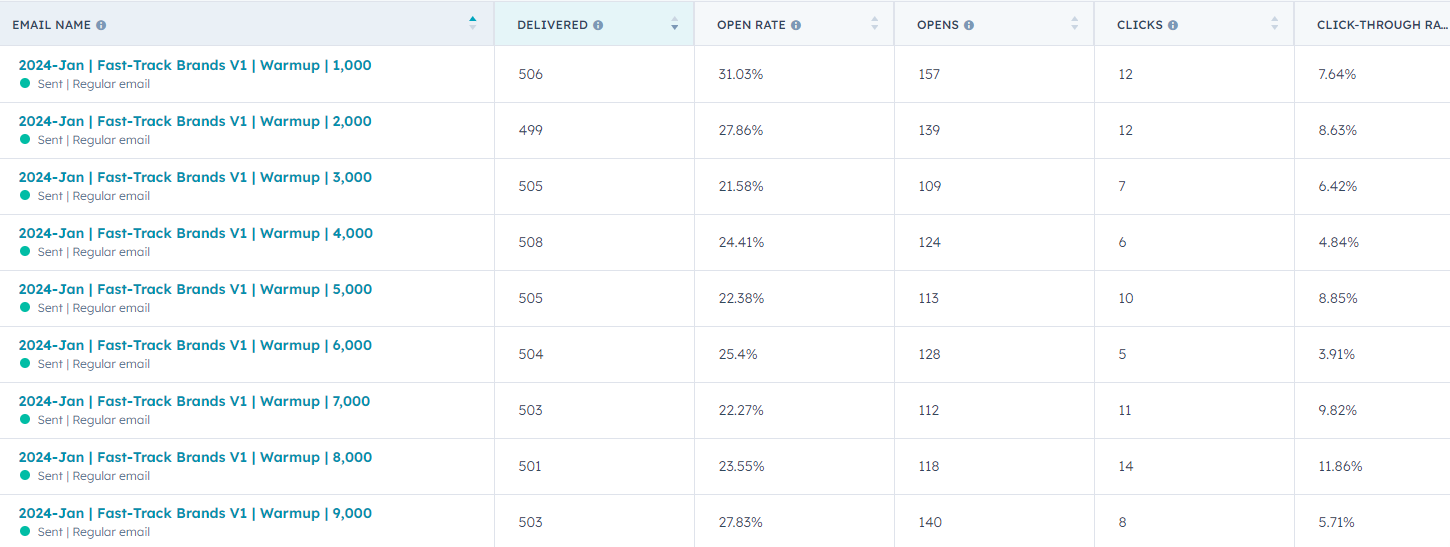
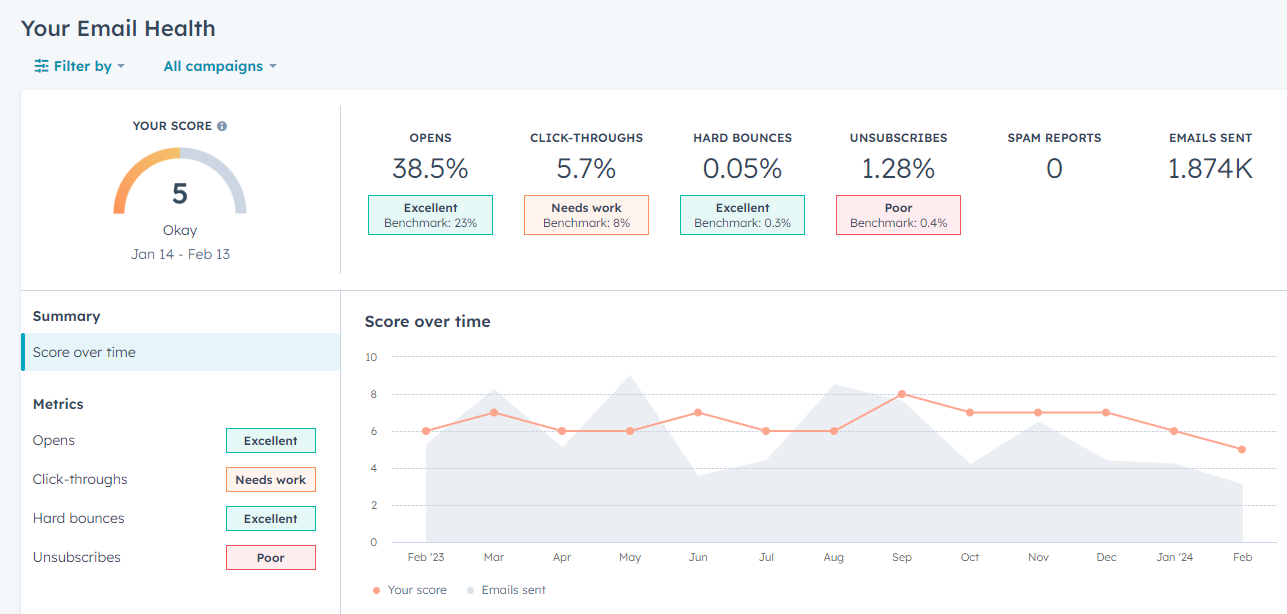
And keep an eye on your HubSpot Email Health Metrics. Here are ours. We are warming up a new email-sending domain RIGHT NOW. We don't send a ton of email, but honestly, we can do better.
conclusion. Ta Da! A Marketing Email Sending Domain
After completing this project, you are ready to send regular marketing emails. However, go easy, and observe it. You have separated your marketing email from your corporate email and put the marketers in their own email space. They can try experiments, do things, and if they screw up, they only hurt themselves versus messing up your corporate.com email-sending domain for the entire company.
Our eleven-step process will help you establish your very own marketing sending email domain and warm up your email list, and your new domain in 40 days or less.

Read More About Email
- How to Create and Warmup a Marketing Email Sending Domain
- HubSpot Customers: How To Fix Your DNS Records To Comply With Google Yahoo 2024 Email Policy Changes
- Remove Group Emails From B2B Email Campaigns
- 📧 Preparing For 2024: Essential Google & Yahoo Email Tips For HubSpot Marketers
- GURU 2023 Recap 👀 Jay Schwedelson's Online Email Marketing Conference
- 📧 Email Mentor Serves Up 🔥 Quick Tips In New HubSpot Webinar
- The Truth About Email Deliverability