If you are migrating your WordPress website to HubSpot, you have made a fantastic decision! HubSpot's CMS is an incredible platform to use, offering an intuitive interface without the hassle of plugin maintenance. HubSpot offers a comparison here. HubSpot also makes the migration from WordPress, frankly, a piece of cake. In this post, we provide tips for going through the process.
HubSpot Migration Steps:
Step 1:
Build an inventory of what pages you want to migrate from your site using Google Sheets or Excel. These should be your core pages (i.e., home page, product page(s), high traffic pages). It is also a good idea to check Google Analytics reporting to see if there are any pages that you have missed in your inventory. You'd be surprised how many orphan pages you may have.
Step 2:
Contact HubSpot or a HubSpot migration expert about the migration. They will send you a list of URLs that will be migrated to the HubSpot Content Management System (CMS). Once you approve the URLs, they will send a payment link, and an authorized user must submit payment. This officially kicks off the migration process with HubSpot.
Step 3:
Once migration is kicked off, a HubSpot user can go into their account and billing section and monitor migration progress under Account & Billing-Migrations. A migration typically takes about two weeks to be ready for Quality Assurance (QA) checks.

While migration is underway, you will see pages created in HubSpot under Content-Website Pages.

You will notice that these pages are not pointing to your domain yet. During migration, they will point to a staging domain hosted by HubSpot.
Step 4:
The QA process starts once HubSpot has finished the preliminary migration. You must ensure all the HubSpot pages match your existing B2B website. To do this perfectly, set up two monitors side by side, click every link, and look at every page on your live site and your HubSpot website. Click around in the preview to ensure the pages link correctly, have the correct images, etc. We strongly recommend having multiple people from your team do QA checks.
NOTE: The URL structure is fundamental. You want to ensure all existing pages in HubSpot have the EXACT same URL as in WordPress. A valuable tool to help with your complete inventory QA checks is Screaming Frog. —Screaming Frog’s free version will give you a list of page URLs, meta tags, and other basic data from your existing site. You can use that list to confirm that the pages in HubSpot match what is showing on the web hosted by WordPress.
Step 5:
Once you’ve checked all the URLs and finalized your QA, you are ready to point to the HubSpot CMS.
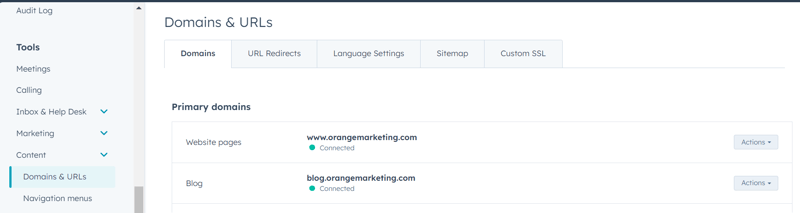
In HubSpot, go to Settings-Content-Domains & URLs. Select Connect a Domain. The system will then walk you through the process. HubSpot wants your website to be named www.xxxx.com, with "www" being a subdomain.
Step 6:
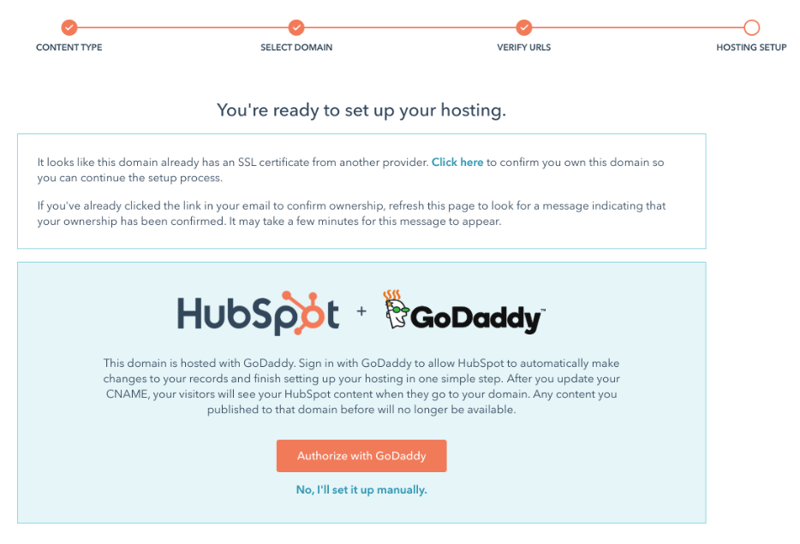
Once you complete the Connect a Domain process, you will be asked to make changes to your DNS through your hosting service.
If you have an existing SSL, you can use it by following the instructions on this screen. Or you can enable the HubSpot SSL. We recommend using the HubSpot SSL for your marketing website.
Step 7:
Now, you need to repoint the DNS for your B2B website to HubSpot’s DNS. Make sure you have the required HTTPS. If your DNS provider supports forwarding, redirect your DNS settings so your non-www domain (such as hubspot.com) will forward to your www domain (such as www.hubspot.com).
Step 8:
Once the DNS changes are made, the website pages in HubSpot should now point to your website’s domain.
Step 9:
You should now conduct another QA check. Click through the entire website and make sure all links are operational.
Step 10:
You are now ready to unpublish your website pages from the original hosting platform (WordPress).
Step 11:
Lastly, check to see if any oddball redirects have been created. Go to Settings-URL Redirects.
Check the domain redirects to see if they are functioning. Delete any unnecessary redirects that may have been created during the process. HubSpot automatically creates redirects when changing URL names; if you don't stay on top of that, it can make a bit of a mess with unnecessary redirects.

Simplify Your Website Management with Orange Marketing
As a HubSpot Diamond partner, our comprehensive HubSpot migration service seamlessly transitions your website while preserving your design with minimal effort on your part. We handle the entire project, recreate all your content, and provide everything you need to enhance your website. Our service includes:
- Full-Service HubSpot Website Migrations: Seamless transition without sacrificing design.
- Comprehensive Project Management: From initial crawl and theme selection to content migration, QA, and launch.
- Proven Track Record: Over 95 five-star reviews, HubSpot's Onboarding and Data Migration Accreditations, and all HubSpot CMS certifications.
- Expert Assistance: Minimal effort needed on your part, ensuring all content is recreated perfectly.
Get started today with a free consultation about your HubSpot needs! Contact Orange Marketing now to start your hassle-free HubSpot migration.
