If you attend conferences, industry events, or meetings where you present to potential buyers or partners, you’ve probably wrestled with the same problem: how to easily distribute your presentation materials and track who’s interested—without manually sorting through business cards or email follow-ups.
Here we show you exactly how to build a seamless, repeatable workflow in HubSpot that:
- Lets event attendees request your slides via QR code,
- Automatically enrolls them in a follow-up sequence, and
- Creates a sales-ready contact list.
This is perfect for executive and sales presentations, and once you set it up once, it’s easy to clone and reuse for future events. We've broken this process down into 10 clear steps.
Overview: What This Workflow Does
Workflow Summary:
➡️ QR Code → HubSpot Form → Email Sequence → Sales Contact List
This workflow is designed so that when an attendee scans a specific QR code, they’re taken to a HubSpot form branded for your event.
After submission, they’re added to an automated sequence that sends them the materials and initiates follow-up. Behind the scenes, the contact is tagged by event, assigned to a rep, and added to an active list for reporting.
You can watch the video demonstration OR read the workflow steps at your leisure below:
Step-by-Step: Setting Up Your HubSpot Workflow
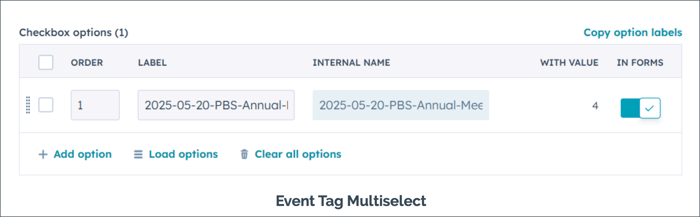
Step 1: Create an “Event Tag” Property
Why this matters: It allows you to track contacts by specific events so you can build lists and reports later.
How to do it:
- Go to Settings > Properties
- Find or create a property called "Event Tag" (Dropdown or Multiselect)
- Add your specific event name to the dropdown options
- Make sure this field is pre-filled in your form via a hidden field
Step 2: Clone an Event-Specific Form
How to do it:
- Navigate to Marketing > Forms
- Clone a template form (or create from scratch)
- Rename it for your event
- Ensure to select the "Event Tag" you created
- Adjust other fields as needed
Step 3: Generate a QR Code That Links to the Form
How to do it:
- Use QR Code Generator Pro or your preferred tool
- Link to your HubSpot form URL
- Add your logo and customize the appearance
- Download the QR code image
- Test the QR code! Make sure it opens the right form
Step 4: Create the Event Contact List
How to do it:
- Go to Contacts > Lists
- Create a new Active List
- Set criteria to include contacts with "Event Tag" = [Your Event Name]
- Save with a clear name like “July-2025-Great-Big-Summer-Forum”
💡 Pro Tip: Use consistent naming for forms, lists, and sequences to avoid confusion.
Step 5: Upload Your Materials to HubSpot Documents
How to do it:
- Go to Sales > Documents
- Upload your PDF slides or resources
- Rename the files clearly with your event and year
- Use these document links in your follow-up emails
Step 6: Create the Follow-Up Email Template
How to do it:
- Go to Marketing > Email > Templates
- Clone your template (e.g., “TY for requesting PBS materials”)
- Update it with new document links
- Save with the event name in the title

Step 7: Build the Email Sequence
How to do it:
- Go to Automation > Sequences
- Clone a past event sequence
- Connect your new email template
- In the Automate tab, add a custom automation trigger: “When form is submitted”
- Set the trigger to launch your sequence
- Assign sequence sender as the contact owner
✅ Checklist:
- Change sharing settings to “Everyone”:

- Make sure “Business days only” is turned ON (if needed) -- but be aware if you are testing over the weekend it may drive you crazy (happened to us):

⚠️ Troubleshooting Tips:
- If emails don’t send, check if you tested the sequence on a weekend.
- Confirm your sequence was published and not left in draft.
- Ensure your form has the correct hidden Event Tag field or it won’t match the list filter.
You can watch a video of how to troubleshoot common email sequence errors here:
Step 8: Assign Contacts via Workflow
How to do it:
- Go to Automation > Workflows
- Create workflow
- Set the enrollment criteria to form submission or Event Tag
- Assign contacts to the relevant rep
- Turn the workflow ON
Step 9: TEST the Entire Flow
Before you use this live at an event:
- Scan the QR code on your phone
- Submit the form
- Confirm that the sequence triggers
- Check that you appear on the event list
- Check that the right contact owner is assigned
💡 Pro Tip: Send a test submission the day before your event and verify all steps work.
Step 10: Report on Engagement
After the event, create two simple reports:
- Count of contacts with your Event Tag
- Deals associated with those contacts
Go to Reports > Custom Reports > Contact or Deal-Based Reports, and filter using the Event Tag.
Why This Presentation Automation Follow Up Works
This process is a scalable way to:
- Distribute your presentation materials with zero manual follow-up
- Qualify interest based on who scans the code
- Track attribution from event to contact to deal
- Create an evergreen system you can clone for future events
No more spreadsheets, missed follow-ups, or guessing who wanted what. Just scan, submit, and let HubSpot do the work.
Let HubSpot Do the Heavy Lifting
With a little upfront setup, you can transform one of the messiest parts of your sales or fundraising events into a well-oiled machine. Add your own flair to the templates, personalize your sequences, and adapt the workflow as needed—but don’t skip the testing.
Need a Helping Hand?
We are absolute pros at setting up HubSpot automation and have done so for hundreds of clients. Let us help you get this automation rolling, and implement other HubSpot sales and marketing automations that will give your teams the power to stay on top of leads in the most effective and successful way possible—Connect with us to learn more.
