
Top HubSpot Updates for the past week ending April 22, 2024:
- Calling Apps in Help Desk,
- Sequences embedded automation,
- Create folders and organize your files from Mobile.
Calling Apps in Help Desk
With Calling apps in the Help Desk, you can connect your existing calling integration phone lines to the HubSpot Help Desk, directing inbound calls to a group of reps or teams. Inbound calls will ring your selected users or teams simultaneously, creating a new ticket in the connected pipeline. This new calling connection is currently available with the Aircall calling app, other apps coming soon.
How Does it Work?
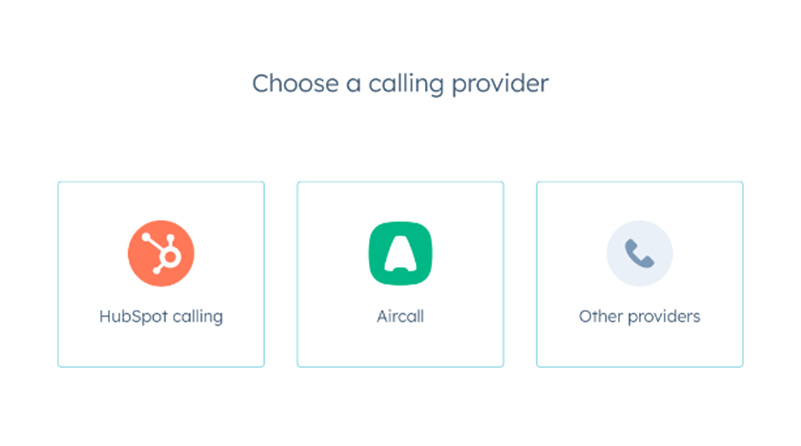
To configure your Calling App in a Help Desk channel:
- In your HubSpot account, click the settings icon in the main navigation bar.
- In the left sidebar menu, under Tools, click Inbox & Help Desk > Help Desk.
- Click Connect a channel on the top right.
- Click Calling
- Select a Calling Provider
- Select a phone number from your calling integration list to connect

- Select "Continue to Setup"
- Next, on the ticket automation page, select "Set ticket properties for this channel" to customize which properties new tickets from this channel will include.
- Click Done

Once the channel connection setup in Help Desk is complete, go to Call Settings to ensure your call preference is set to ring your calling app.
- Settings -> Under Your Preferences, select “General.”
- Click on the Calling tab at the top of the page, then scroll down to “Inbound calling provider and preferences.”
- Click the dropdown "Receive calls through" and select your Calling App.

Now, with all the ring preferences and Help Desk connection set, when an inbound call is placed, it will ring in the browser in your calling app.

Also note: To place Outbound calls from the Help Desk, select the call option from the ticket thread and select your calling app.


Sequences Embedded Automation
Allowing for custom enrollment and unenrollment criteria in sequences allows customers to better automate their sales outreach to match their marketing and sales processes. This update helps sequences dynamically enroll based on marketing intent signals like submitting a form or viewing a website page.
How Does it Work?
This is available to Sales and Service Hub Pro and Enterprise customers.
Navigate to Automation > Sequences to view the new Automate tab. Users can now view and manage existing automations as well as create new ones all in one place.

Create a new embedded automation in the top right corner and configure the trigger and action. We currently support the following triggers:
- Start or end a sequence when a contact submits a form
- Start or end a sequence when a contact views a page on your website

When enrolling a contact in a sequence, users can configure a delay and specify which user the sequence will send on behalf of.

Once the Automation is turned on, contacts will automatically be added or removed from the sequence as soon as they meet the trigger.
Create Folders and Organize Your Files From Mobile
Do you need to share the new photo you took from your smartphone with your team? Now, you can do it using HubSpot Files on mobile.
By enabling Files on the app, we empower you, our users, to upload, download, and manage your files in one place and on the go.
Having all your files accessible from any platform is a must in this day and age. How many times have you needed a document that you had saved in your cloud? Have you ever accessed your cloud files to share this specific PDF with your client?
In this second iteration, you can create your folders on mobile. If you are an Android user, you can create folders to upload content directly to.

On one side, you can access all your files from the main HubSpot mobile navigation under the Files option. There, you will be able to search and sort your files and navigate through your folders.
Once you find the file you were looking for, you can either move it to trash, download or save it on your smartphone, or share it natively.
Alternatively, you can create your own folders and upload your content in them.
Let’s imagine that you are a marketer at a conference, you create a specific folder for it and upload pictures from the event directly there.
If you use Files, all your assets will be well organized and your team will be able to work in the same space with the same files, isn’t that efficient and well organized?
Uploading documents on the mobile app can also be relevant if you are a sales representative on the road who needs to upload attachments directly to Files to later add them to your records.
You will be able to upload photos and videos from your phone library, as well as your camera and documents. All files uploaded will be set up by default as Public, but then you will be able to change the file visibility and set it as Public, Public- no index, and Private.
And what happens if you make a mistake while uploading your files? It’s all right; you can move to trash all the files you don’t want on your Files. To do it, you will have to access the file you want to move to trash and click on the three dots menu; from there, all the edit options will be shown.
Using HubSpot for ABM Strategies
Learn to create and implement ABM strategies in HubSpot, focusing on high-value accounts with our new step-by-step guide, Mastering Account Based Marketing Using HubSpot!
Download now to discover:
🔍 Essential Strategies for Choosing Target Accounts
📊 Using Predictive Analytics for Precision Targeting
🛠️ Setting Up HubSpot's ABM Tools Efficiently
👀 And much more!
Don't miss out!
