Top HubSpot Updates for the past week ending April 22, 2024:
- User Object available in Workflows,
- AI Assistant to build workflow actions,
- Improvements to 'Marketing event' associations in Campaigns,
- AI Chatbot.
User Object Available in Workflows
Workflows can now be configured to be User-based. Customers will experience the same behavior that they are used to when building workflows centered around Users.
How Does it Work?
1) From Workflows, create a new Workflow and select "User-based". Choose whether you want to start with a Blank workflow or Schedule a recurring workflow.
2) Choose your User enrollment trigger. This could be when an event occurs, such as when a user is created; when a filter criteria is met, for example when a user's HubSpot team equals a certain value; or when choosing to trigger your workflow around a schedule.
3) Add actions, delays, or branches. For example, you could send an internal email to welcome a new user to your team or notify a particular user that they have a new team member added to HubSpot.

Once you are satisfied with the automation you've built, click Review and Publish, and turn it on when you're ready for it to start firing.
AI Assistant to Build Workflow Actions
Building a workflow can be a technical, time-consuming task. Since automation requires an upfront investment of time, it can be a barrier to automating in the first place, even when you know there will be efficiency gains on the other end.

Why Does It Matter?
With AI Assistant in workflows, HubSpot brings even more time-savings and efficiency to automation, allowing front office teams to automate and streamline processes in a couple of clicks while maintaining full control over the outcome. AI Assistant also decreases the learning curve and helps you build those automated processes you have considered but may not know how to configure from scratch.
Example action prompts AI Assistant can help with:
- Wait seven days, then send the "Welcome" email to the customer. Then, send a Slack notification to the account manager.
- Set marketing contact status to non-marketing contact and remove from "Leads" list.
- Send an in-app notification with the subject: "A new meeting has been booked" and create a task for the deal owner called "Prepare for meeting" due in 3 business days.
How Does it Work?
To add AI generated actions to your workflow, open the workflow editor and open the action panel. At the top, you'll see an option to use the AI assistant to create your actions.
Note: In order to use the AI assistant, AI features must be enabled by a super admin in your portal. If this is currently disabled, share these instructions with your admin.
After entering a prompt and clicking generate, there are approval steps to ensure the suggested workflow meets your expectations. We recommend:
- Reviewing the generated actions.
- Keep the generated actions if satisfied with the result.
- Optionally complete any additional setup that's needed.
- Test and Review your workflow.
- And finally, turn the workflow on and enjoy your new free time!
Improvements to 'Marketing event' Associations in Campaigns
HubSpot improved the association functionality of ‘marketing events’ with a HubSpot campaign: You can now add marketing events, including offline event data, to a campaign and create a new marketing event from within the ‘Add assets’ modal.
Why Does It Matter?
Historically, it was only possible to add 'online' marketing events to a campaign when selecting the 'Marketing events' category. The respective marketing events data origins from HubSpot's Marketing events object, allowing you to manage online (virtual) marketing events activities with an event integration such as Zoom, Eventbrite, GoToWebinar, etc.
However, restricting event activity in the Campaigns tool to solely 'online' marketing events leads to incomplete campaign management processes, forcing you to find time-consuming and cumbersome workarounds. With trade shows remaining a vital ROI source for marketing teams, 'static contact lists' have often been added to a campaign to help track offline event registrants, attendees, no-shows, and more.
With the latest improvements to HubSpot's Marketing events object, you can manage online marketing events (via integration) and non-online marketing activities (via new import flow) from within one object. This means you can now bring all your marketing events data into HubSpot and use the power of HubSpot Marketing events to manage and automate your event activities.
This, in turn, enriches the marketing events data inside the Campaigns tool, which makes it easier for you to manage and report on your marketing campaigns that include online and offline event data - removing the needs for workaround and siloed campaigns reporting.
How Does It Work?
- Navigate to Campaigns.
- Create a new campaign or select an existing campaign.
- Navigate to ‘Add Assets’.
- On the left, click ‘Marketing events’.
- You can now find your already created marketing events in the table, filtered by 'event source' (integration vs. manually created), the event status and when it was last updated.
- Select the relevant marketing events (or click 'Create marketing event' to create a new one) and click ‘save’.
- Any selected marketing event (including your imported offline events data) has now been added to your campaign.
Contact interactions with the event will affect the respective campaign metrics, including 'influenced contacts' and your revenue (attribution) reporting.
To learn more about creating, managing, and reporting on marketing events, click here.
AI Chatbot
Businesses can now deliver personalized responses to their visitors within minutes through an AI Chatbot. No longer will you need to dedicate hours to crafting and refining rules-based bots. With AI Chatbots handling repetitive tasks seamlessly, you can free up time for your front-office teams to prioritize revenue-generating activities. Rest assured, with built-in guardrails, that your AI will respond when it's confident and transfer to a team member when it's not.

How Does It Work?
1. Start by adding Knowledge Base articles and/or publicly available URLs to your chatbot so that the AI Chatbot can leverage the content from those data sources to generate responses to your website visitors.
- Please note: Any updates made to your HubSpot-hosted Knowledge Base articles will automatically sync with your AI chatbot, eliminating the need for manual data updates.
2. Assign your AI Chatbot to an existing live chat chatflow you have set up. As part of this step, you'll also need to define your welcome message and who should respond when users need a live agent.
- Please note: To start automating conversations with your AI Chatbot, you must create a chatflow with live chat and connect it to the conversations inbox or help desk workspace. Without it, the AI Chatbot will not be able to have conversations with your visitors.

3. You'll then be redirected to the Build tab of the live chat setup. Here, you can preview the Welcome Message and Assignment behavior set in the previous step. When you're done setting up your live chat, in the top right, click Preview to review the responses your AI will generate.

4. Publish your AI Chatbot to your website visitors by toggling the switch on in the upper right corner of the page. Before you know it, you'll free up time for your front-office teams to focus on higher revenue-driving tasks.
In the future, if you want to update any of the content your AI Chatbot uses, simply navigate to the AI Chatbot app to manage your data sources.
- New nav: Automation > AI Chatbot
- Old nav: Conversations > AI Chatbot

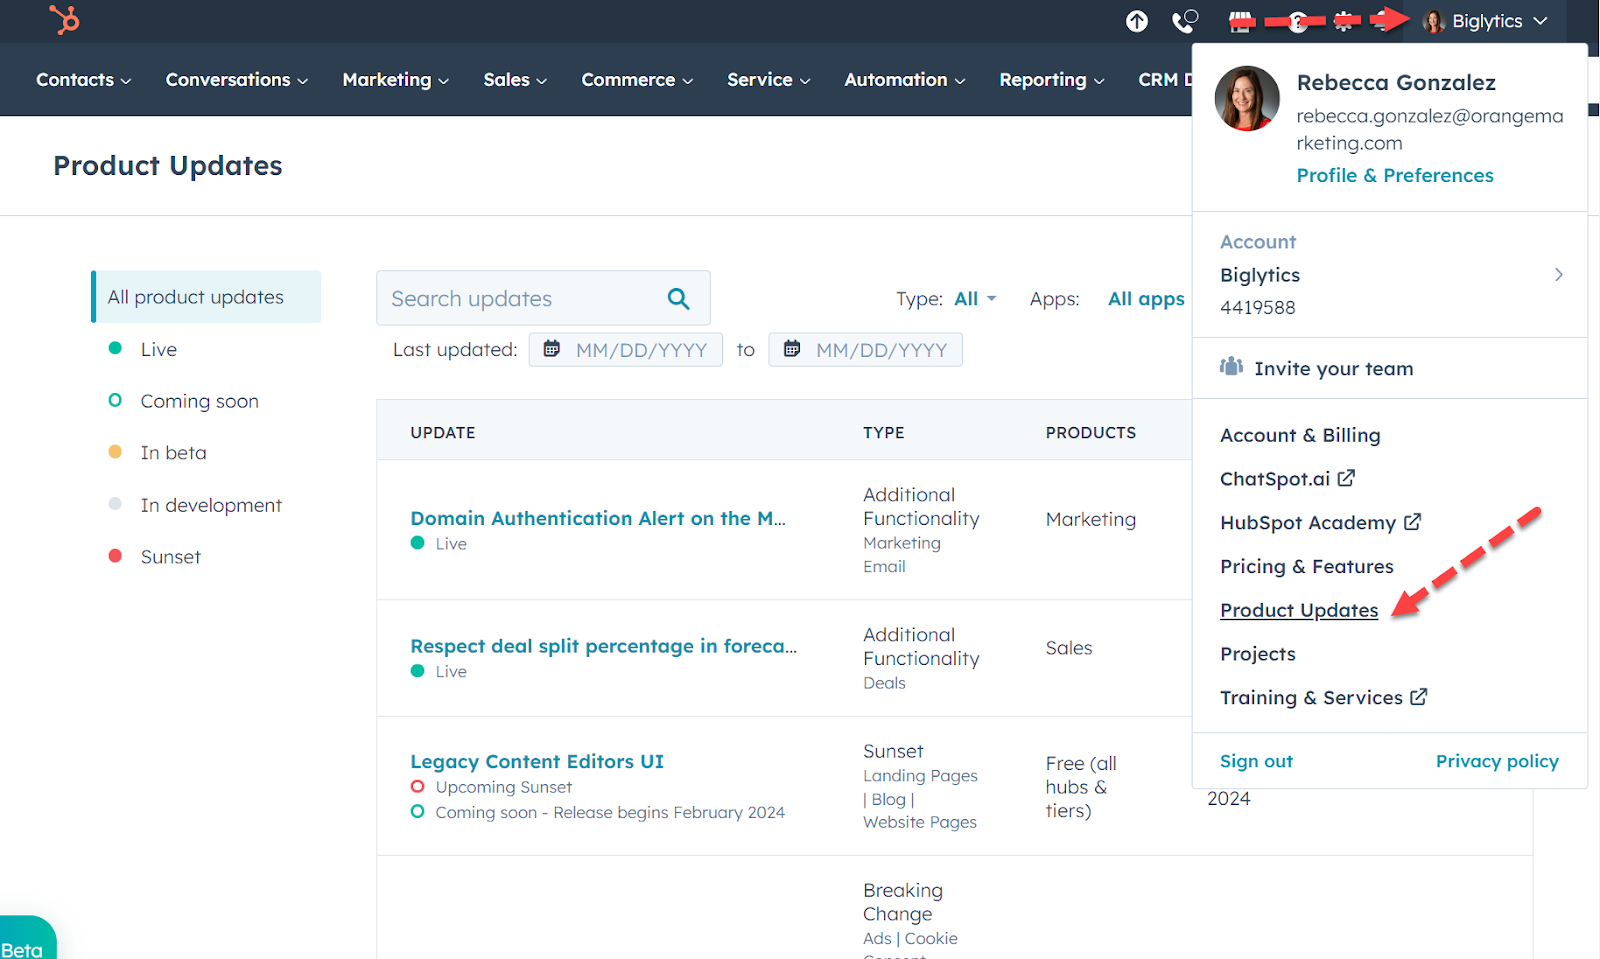
Want To See All Of This Week's Updates?
Thank you all for making it this far! We do our best to keep you informed of what we believe to be the most important updates every week.
However, if you'd like to look deeper at these recent HubSpot updates and more, you can! Simply log in to your HubSpot account, click on your profile in the top right to open the drop-down menu, and then click on "Product Updates". There, you will see all of the live updates, as well as those that are on the way!
HubSpot Experts
Could you use some HubSpot help? We're the experts! Click here to connect with our team.